PE Civil Construction · Complete public lesson
Zero-force members: recheck the joint when the load moves
Identify the joint conditions that make BD a zero-force member, then use vertical equilibrium when a load is applied at that joint.
Try one application question free. Read or watch the example, then check your reasoning. No account or payment required.
Try the application question →Zero force now. What happens when the load moves?
Watch the two load cases, isolate joint B and follow the equilibrium calculation. Then try the 18-kip application question below.
Original instructional example. These are separate load cases for an ideal pin-jointed truss, not a design authorization to remove a member.
Read the video transcript
Watch the highlighted member. Move the load, and its force changes from zero to twelve kips.
Assume an ideal pin-jointed truss, joint loads only, and negligible member weight.
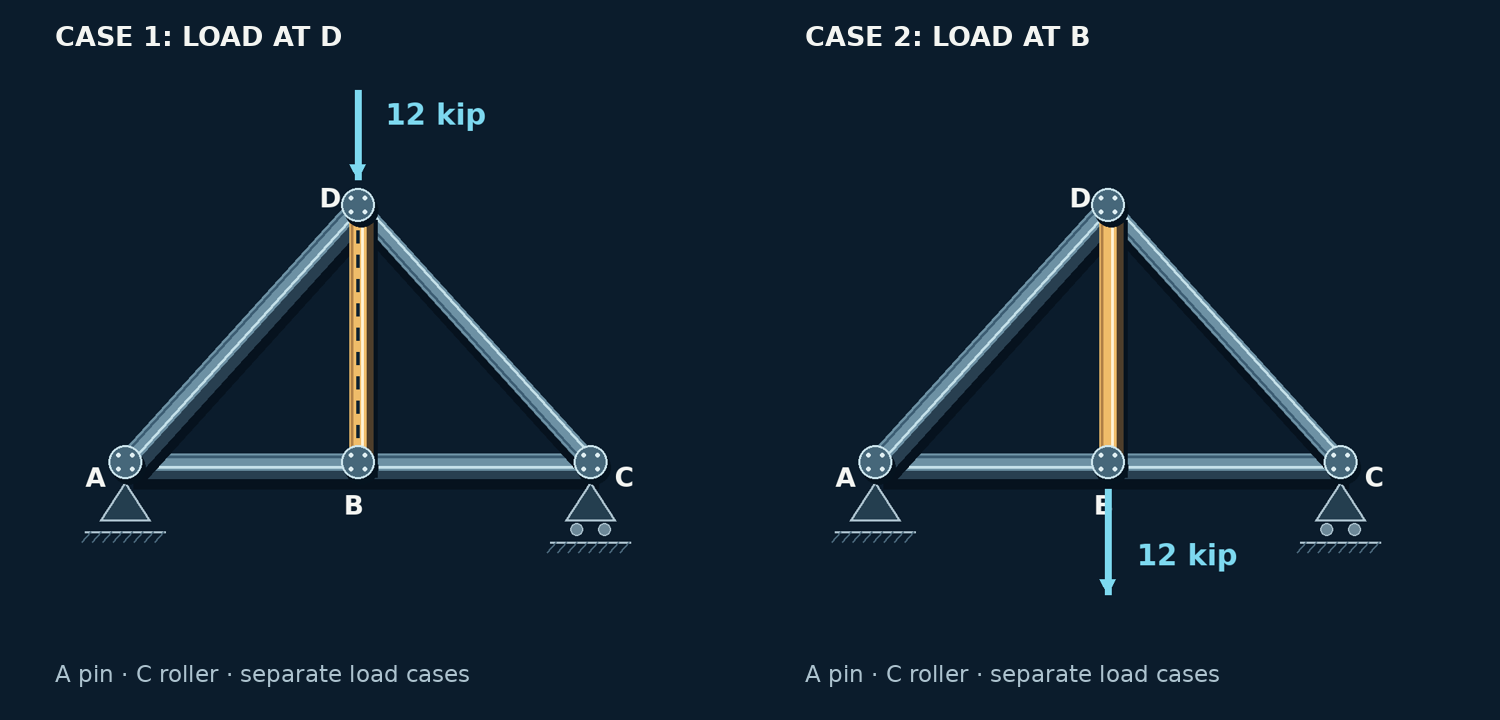
Case one: twelve kips downward at D. Look at joint B. AB and BC are collinear. There is no external load or support reaction at B. Vertical equilibrium makes BD a zero-force member.
Now move that same twelve-kip load to B. These are separate load cases.
At B, the horizontal members cannot balance the downward load. BD must pull upward.
Sum vertical forces: force in BD minus twelve equals zero. BD carries twelve kips in tension.
The exam habit: recheck the joint whenever the loading changes. Zero force describes a load case.
Try a free PE Civil Construction question at ReasonSpan.com. Visit ReasonSpan.com for more information.
The situation and givens
An ideal planar truss has A at (0, 0) ft, B at (3, 0) ft, C at (6, 0) ft and D at (3, 4) ft. Members AB, BC, AD, CD and BD connect the joints. Compare two separate load cases: a 12-kip downward load at D, then the same load applied at B instead.
- A is a pin support; C is a roller on a horizontal surface.
- All joints are ideal pins; loads act only at joints; member self-weight is excluded.
- AB and BC are horizontal and collinear. BD is vertical.
- Case 1: 12 kip downward at D, with no external load or support reaction at B.
- Case 2: 12 kip downward at B instead of D. The two loads do not act simultaneously.
- Positive member force denotes tension.
Complete worked method
1. Inspect the unloaded joint in case 1
At B, exactly three members meet. AB and BC are collinear. No external force or support reaction acts at B. The horizontal members cannot supply a vertical component, so BD must carry zero axial force for this load case.
2. Recheck the rule after moving the load
Applying the load at B breaks the unloaded-joint condition. Do not carry the zero-force conclusion from case 1 into case 2. AB and BC still provide no vertical component.
3. Solve the loaded joint
Assume member forces pull away from B. BD acts upward, balancing the 12-kip downward external load. A positive result confirms tension.
4. Check what the conclusion means
Zero force is a result for the stated idealization and loading. Different loads, load positions, self-weight or other design requirements can change the demand. The result alone does not establish that a real member can be removed.
Common errors and why they fail
- Using the three-member zero-force rule at a joint that carries an external load or support reaction.
- Treating the two load cases as simultaneous loads.
- Calling BD a compression member even though it must pull upward on joint B.
- Assuming a zero-force result permits removal of a real member.
Apply the method
Keep the same ideal truss, but apply 18 kip downward at B and no load at D. What is the force in BD?
Change one condition
Return to case 1 and replace the 12-kip load at D with 18 kip downward at D. B remains unloaded. Does BD now carry 18 kip? Explain before revealing the answer.
Reveal the worked transfer
BD remains a zero-force member. At B, AB and BC are still collinear and no external force or support reaction acts. Vertical equilibrium still gives FBD = 0. The magnitude at D changes other forces and reactions, but does not change this local joint conclusion.
Put the method to work
Try different questions to check whether you can identify the governing condition and explain the next action. The free sampler includes answers and worked explanations.